If you are running storjshare-daemon on your server, here are the steps to update the client:
storjshare save
storjshare killall
npm install -g storjshare-daemon
storjshare daemon
storjshare load
Electronics, Web, Travel & More
If you are running storjshare-daemon on your server, here are the steps to update the client:
storjshare save storjshare killall npm install -g storjshare-daemon storjshare daemon storjshare load
If you wanna check if php-curl extension is installed in your system, type on terminal
sudo php -m | grep "curl"
If the response from the code above is empty, the extension is not being loaded with php. Then you can install it with:
CentOS
yum install php-curl
Ubuntu
sudo apt-get install php5-curl
If you are like me who is always trying different linux builds for Raspberry Pi or keeps messing up with Kodis configurations, this post is for your. I will teach you to make an perfect image of your SD Card so that you can simply go back to the last image, without having to install everything again from scratch.
If you don’t know how to install any linux distribution for RPi, I suggest you to follow this guide HERE
diskutil list
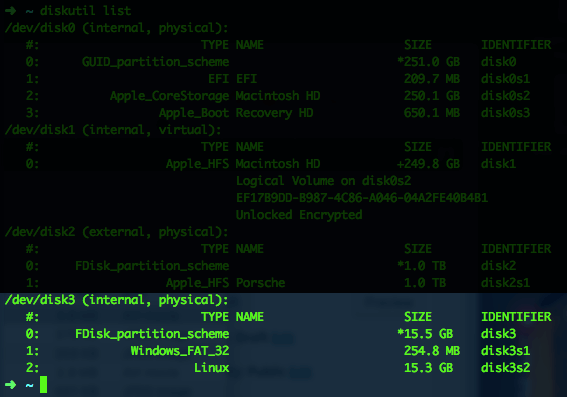
In my case, the SD card is in /dev/disk3. Remember that you are looking for the disk (not partition) of your SD card, so it would be disk4, not disk3s1.
diskutil unmountDisk /dev/disk(disk# from diskutil)
for example, in my case:
diskutil unmountDisk /dev/disk3
sudo dd if=/dev/disk(disk#) of=my_rpi_backup_image.img bs=4m
you can change my_rpi_backup_image.img to any other desired name you want. Also the above process can take a few minutes to complete.
sudo dd if=my_rpi_backup_image.img of=/dev/disk(disk#) bs=4m
Same as before, this process can take a few minutes to complete, so you can go have some coffee while your computer finishes the job.
Once it’s done, simply remove the SD Card from your computer, insert it to your RPi and turn it on, it will boot with the system the exact same way as it was before you saved it.
If you need to remove all those hidden ‘.files’ from some folder recursively, you can cd into where you want to remove and use the code below:
find . -name ._\* -print0 | xargs -0 rm -f
When you install a Raspbian Operation System on your Raspberry Pi (I’m currently using Minibian) you can notice that it created a file system with very little space, which can be annoying if you are using a bigger SD card.
I only noticed it when I started to apt-get all those packages that I needed, when suddenly got the message:
cannot copy extracted data for './usr/sbin/php5-fpm' to '/usr/sbin/php5-fpm.dpkg-new': failed to write (No space left on device)
Looking into the SD card’s memory I get:
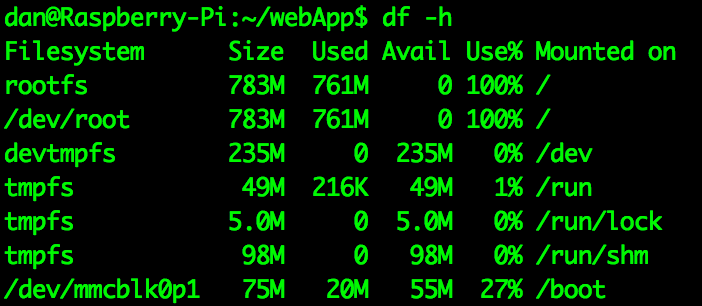
It’s full!!
Continue reading “Raspberry Pi Using Whole SD Card Memory”
I was studying last semester in Politecnico di Milano, a great university in Milan, Italy. Anyway, I am taking lots and lots of pictures here (Italy is a beautiful country).
I am saving my pictures on my computer, but WHAT IF something goes wrong with my computer?
So what I am doing is backing up my pictures (also other things as work files) to my NAS SERVER in Brazil during the night, using RSYNC via SSH (Of course it’s an incremental backup, as I have more then 300GB of photos).
On my server I don’t run SSH on the regular port 22. I use, for example the port 223.
rsync -av --update --delete -e 'ssh -p 223' /Users/dansku/MyDocs/Fotografias
user@servr:/home/daniel/SERVER/Backups/
Where /Users/dansku/MyDocs/Fotografias is the local dir, and /daniel/SERVER/Backups is the remote dir.
This way, even if my computer is stolen, I know my data is backed up!