
In this tutorial, we are going to configure a brand new $5/month DigitalOcean server that will run one or multiple Helium miners. Note that by using the link above, you will be rewarded with a $100 credit bonus that is valid for two months, which is perfect to test the platform and also two months of free miner hosting!
I am not going to get into details about what Helium is and how to use it, but it’s an amazing project where people all around the world are getting together to build a HUGE LoraWAN mesh network to enable anyone to have access to an almost-free IoT network. To check more, go to https://www.helium.com.
This tutorial video
If this video helped you, please consider donating to:
- BuyMeACoffee – https://www.buymeacoffee.com/dspillere
- BTC – bc1qwn59fjhmz2wy376y6vltjj73a63j0nzaapu42f
- ETH – 0x2b4d4a660CddaE942C26821a5512c32023719476
- HNT – 14bnEtUmqPaCrXmjzQ8XasTJhz7hfyWY9gt2ByqUdvBJVVEczmr
Create a new DigitalOcean Server
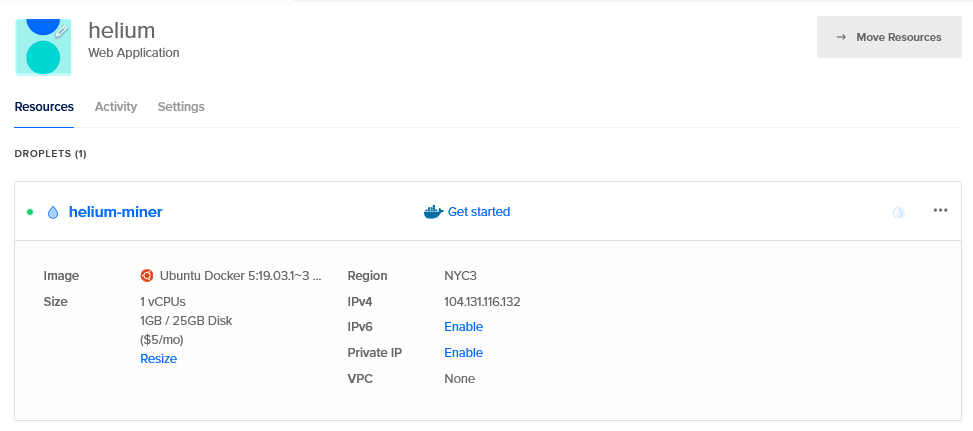
After creating your DigitalOcean account, log in, and create a new Droplet like the gif below:

Once your droplet has finished provisioning, you will be able to connect to it using the provided IPv4 address and the password that you used on the previous step. For this tutorial, the server IPv4 is 104.131.116.132, remember this as we will use it in many future steps.
Let’s connect to the server using the terminal. If you are on Mac you can use iTerm, and if you are on Windows, I recommend checking out the Windows Terminal. If you have any questions, just fill out the comment form with your questions and I will do the best to help you out!
To connect to the server, on the terminal, type ssh root@104.131.116.132 (change the IP to your own server address), type yes and the password.
If you see root@helium-miner:~#, this means that you are connected! Type apt update && apt upgrade to make sure we have all programs running on the latest version!
Good job, let’s move on to the next steps.
Let’s check if docker is working by typing docker ps:

Opening Ports
From the helium miner documentation: Before launching the Miner, you will want to configure ports on your network to forward two ports:
- 44158/TCP: the Miner communicates to other Miners over this port. The networking logic knows how to get around a lack of forwarding here, but you will get better performance by forwarding the port.
- 1680/UDP: the radio connects to the Miner over this port. You will not be able to forward packets or participate in Proof of Coverage without this.
This means that for the miner, we need to open ports 44158/TCP and 1680/UDP, to do so, type ufw allow 44158/tcp and ufw allow 1680/udp.

Running your container
It’s time to configure and install the miner. First of all, let’s create a folder where we will store all the miner files. On the terminal, type mkdir ~/miner_data to create an empty folder where all the miner data will resid.
Create a file caller runMiner.sh with nano runMiner.sh and type the following code block:
docker run -d \
--env REGION_OVERRIDE=EU868 \
--restart always \
--publish 1680:1680/udp \
--publish 44158:44158/tcp \
--name miner \
--mount type=bind,source=/root/miner_data,target=/var/data \
quay.io/team-helium/miner:miner-amd64_2020.08.21.0_GA
You need to change two lines on the block, the first is to make sure you are using the right REGION_OVERRIDE frequency to:
US915 | EU868 | EU433 | CN470 | CN779 | AU915 | AS923 | KR920 | IN865
As I am in Europe, I am going with EU868 (Europe, frequency 868Mhz).
The second part that you need to update is the last line, where you need to select the right docker image. You can get the latest version at https://quay.io/repository/team-helium/miner?tab=tags. For this server, make sure to use an amd64 image such as miner-amd64_2020.08.21.0_GA, which is the latest one (at the time I am writing this).
At this point, everything is ready to go! All you need to do is to start the miner using sh runMiner.sh and it should start!!! The first thing docker will do is check if you have the images on your server, which you don’t, and download them. Then it will automatically start the miner, which will then start syncing with the blockchain!
To check if the image is running, type docker ps, and the result should be something similar to this:

On your gateway, point it to our server 104.131.116.132 and you will be good to go!
Extras
Backup your swarm key
This step is extremely important! Once helium enables miners to actually mine HNT tokens, you will need to pay $50 to join the network, and if you lose the key, you will need to purchase a new one!
To back up the key, go to the miner folder ~/miner_data/miner, and inside you will find a file called swarm_key. Make sure you save this somewhere safe for future use. (If something goes wrong with the server, this is the only file that will enable you to recover your miner!)
Check if the blockchain is in sync
The command docker exec miner miner info height && curl https://api.helium.io/v1/blocks/height will compare the height of the blockchain we have on the server with the real one. Once the two numbers match, it means that our server is fully in sync and ready to roll!

As you can see in the image above, my server is yet not in sync as locally I have 455760 and the official block height is 465893.
Running multiple miners on the same server
To run a second miner, you need to open two new ports, 1681/udp and 44159/tcp with ufw allow 44159/tcp and ufw allow 1681/udp.
Create a new folder for the miner data with mkdir ~/miner_data2, create a new runMiner2.sh and edit the file as suggested below:
docker run -d \
--env REGION_OVERRIDE=EU868 \
--restart always \
--publish 1681:1680/udp \
--publish 44159:44158/tcp \
--name miner2 \
--mount type=bind,source=/root/miner_data2,target=/var/data \
quay.io/team-helium/miner:miner-amd64_2020.08.21.0_GA
Then to run it, simply type sh runMiner2.sh.
To test the block sync, use docker exec miner2 miner info height && curl https://api.helium.io/v1/blocks/height
Super sweetness!
Is it possible to earn hnt mining this way?
in the future yes, but you still need the hardware.
I’m getting an error message when running the code.
sh runMiner.sh
“docker run” requires at least 1 argument.
See ‘docker run -help’.
Usage: docker run [OPTIONS] IMAGE [COMMAND] [ARG…]
Run a command in a new container
runMiner.sh: 2: –env: not found
runMiner.sh: 3: –restart: not found
runMiner.sh: 4: –publish: not found
runMiner.sh: 5: –publish: not found
runMiner.sh: 6: –name: not found
runMiner.sh: 7: –mount: not found
runMiner.sh: 8: quay.io/team-helium/miner:miner-amd64_2020.08.21.0_GA: not found
you probably copied the file wrong
How much Helium tokens are you mining per min/day/month?
I set this up two nights ago (thank you, btw. AWS is a nightmare) and I left it to finish syncing. All seemed good. Logged back into my DO account just now and am getting a message that my account has been locked. “your account has been flagged for abuse. If you feel that our system has made an error please open a support ticket.” Any advice?
Send them a message asking what happened!
Great tutorial. Nicely done.
Do you have hardware for each of these miners? I’m not quite understanding the purpose of this set up if you don’t. (Sorry I’m new to the Helium DIY space).
Yes, you need physical hardware for each one!
I guess you’d update the line quay.io/team-helium/miner:miner-amd64_2020.08.21.0_GA
when a new miner is out? I’m a noob
Yes, exactly!
I receive a similar error, and I cannot find where I am copying anything wrong.
ubuntu@ip-172-31-19-62:~$ sh runMiner.sh
“docker run” requires at least 1 argument.
See ‘docker run –help’.
Usage: docker run [OPTIONS] IMAGE [COMMAND] [ARG…]
Run a command in a new container
You are probably not copying the data correctly!
If you have more questions, please check discord.
Thanks
Would it be possible to have a slight update, adding a copy-paste line for backing up swarm key?
Hey Jay, I’m also a bit noobish but I managed to back-up my key using the “scp” command:
From destination (if you are writing the command on your local Pi/Windows Subsystem Linux Terminal):
scp username@droplet_ip:/path/to/file /path/to/destination
From source (if you are writing the command on your mining Pi/DigitalOcean/AWS terminat):
scp /path/to/file username@destination_host:/path/to/destination
From elsewhere:
scp username@source_ip:/path/to/file username@destination:/path/to/destination
You should add a step on how to upgrade the miner when new ones get released.
Good idea! I am extremely busy in the next two weeks, as soon as this load of work is done, I will put some more love on the tutorials and update with more information! 🙂
The gateway you mentioned here can be a DIY one or not?
yes it can, but it won’t generate any hnt anymore
Hi,
What specific hardware is the requirement before running this miner?
Thanks,
Den
you need to buy an official miner now.
Hey, thank you for your description. Is it still possible with a LowRa gateway to mine HNT?
yes but you need to buy a miner from an official seller.
what if you copy the swam key from a real official helium hotspot and put it on a diy helium hotspot.
would it mine HNT?
in that way would it be possible to mine HNT on it without even having the wireless stuff installed on it?
if you can find the swamkey, then yes.
So helium miner on digital ocean still able to buy swarm key for 50 now days or is it waisting time because I just ran through all the steps and now ready for the 50 keys to mine hnt
You still need a swam_key if you want to mine HNT. But helium is not releasing them anymore.
Thanks for the video and great walk through. I’m new to helium mining. I originally set up port forwarding on my router for 44158 and 1681, but I didn’t realize my IP address was private due to my service provider. This seems like the solution for me to be able to obtain a static IP Address and fix my port forwarding issue.
Question: How does the server I set up on digital ocean know to connect with my particular helium miner?
The configuration shown via Quay.io is for the helium blockchain as a whole, no?
Sorry I’m really new to these networking ideas.
You configure your hardware to point to the IP address to your digital ocean box, not the other way around.
do miners arrive with blank ATECC608A chips is it the onboarding process that then issues the swarm key
Sorry, I don’t know. The swarm_key is generated by helium and their approved manufacturers.
in regards to “do miners arrive with blank ATECC608A chips is it the onboarding process that then issues the swarm key” is looks like the chip is shipped with a unique serial number … and that the chip also generates all keys (secret and public) internally . This makes me think that then these keys are actualy triggered to be made during the onboarding process locking the miner to the helium blockchain info from data sheet http://ww1.microchip.com/downloads/en/DeviceDoc/40001977A.pdf