bookmark_borderOrganizing your dropbox Camera Upload folder with Go

A few years ago I wrote a small Python script to organize the photos uploaded from your phone to Dropbox. Lately, I have been rewriting some of my python scripts to golang for practice and also performance.

All photos are uploaded to Dropbox with a name pattern like 2018-08-01 05.56.40.jpg. What all it does is to parse the date and move it to the right place, for example, 2018-08-01 will move it to a folder called 08-August inside 2018.

golang dropbox photo organizer

Source code:

You can also download the compiled file below, just make sure you make it executable with

chmod +x organize_photos

and run it with

./organize_photos

Download link.

bookmark_borderRoll your own secure Dropbox alternative

Dropbox is a great software that I have been using for almost 10 years. It has helped me a lot during university, sharing project files, backing up my thesis and much more. It is a great service, but it also comes with a lot of problems regarding security and transparency (I will not get in-depth here). You can check for example, this article, or this one (there are many more if you look for it).

With this security issue in my mind, I decided to roll my own Dropbox-like service. The main difference is that I will know where all files are and that I am the only one with access to the unencrypted files. After building my own simple infrastructure, I decided to write a quick tutorial showing my solution and how you can create your own! Let’s get started…

The main software that we are going to use is called Resilio Sync (previously BitTorrent Sync). It takes care of all the syncronization between computer, mobile and server, just like Dropbox.

Continue reading “Roll your own secure Dropbox alternative”

bookmark_borderAutomating screenshot sharing on Windows

One thing that I really liked about mac was how easy it was to generate a screenshot from my screen and share with people. Now that I am pretty much a full-time windows user (besides all the time I spend on a Linux terminal), I needed to find an easy and fast way to share screenshots. And that is where Greenshot comes in handy!

The plan:
A keyboard shortcut to select a region of my screen, automatically generate the image, upload it to my server on a specific FTP folder (can also be done with rsync) and copy the shareable URL to the clipboard.

Step 1: Download Greenshot at http://getgreenshot.org/downloads/ and install it.

Step 2: Download and install NCFTP from http://www.ncftp.com/download/ (NcFTP Client 3.2.6 for Microsoft Windows). After installing it, the ncftp executable files are going to reside on C:\Windows

Step 3: Create a .bat file with the automating code below (changing yourdomain, ftp user and password).

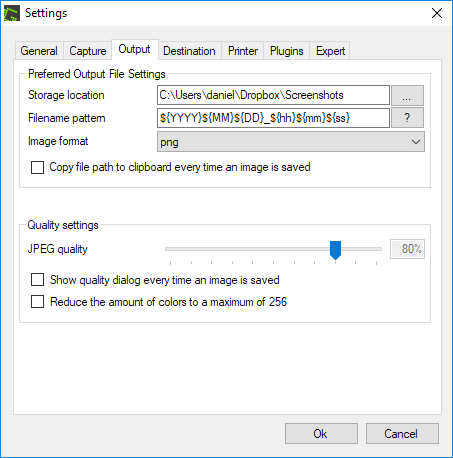
Step 4: Configure greenshot:

Change the path where you save your screenshots on your computer, but the important thing is to change the “Filename pattern” to:

${YYYY}${MM}${DD}_${hh}${mm}${ss}

and uncheck “Copy file path to clipboard every time an image is saved“, this part is important!

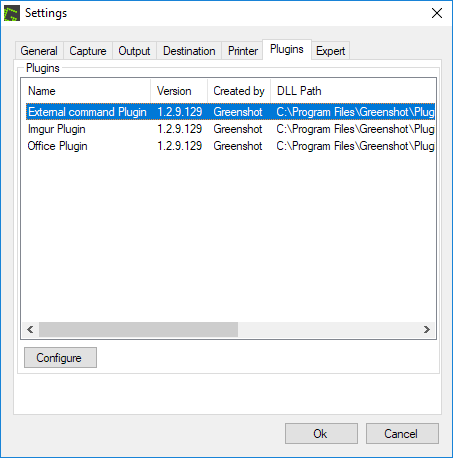
Go to Plugins tab, click in “External command Plugin” and “Configure“.

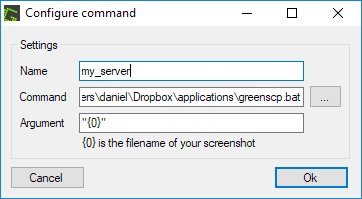
Create a name for your automation. On command, link to the .bat file you created and make sure the “Argument” is

"{0}"

Done, now whenever you take a screenshot, it will automatically upload to your server and copy the URL to the clipboard automatically, making it super fast and easy to share anything on your screen 🙂